
Retrofit Star Delta motor automation on band saw

This is the machine that i am talking about. Improper decoration may cause serious problems.. This machine is so old, that it did not even had a thermal protection for the motor. It had a manual Start-Delta 3-phase switch. The operator must turn the switch to Star for some 5-6 seconds and then turn it to Delta to get full torque. The customer reported that someone forgot to turn the switch to Delta, the motor overloaded and finally it overheated to the point of no return. IMHO, i believe that the machine should not be decorated the way it is, for the operator is easy to get carried away…
In this BLOG entry, i will present a very simple (actually, the simplest one) automation of a Star-Delta motor start up. I made this because i was asked by the customer to make something that will eliminate human error during start-up, and also it will have thermal protection for the motor in case of overload…

Getting started
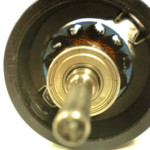
This is the switch that the machine originally had. Many of you are familiar with this type of switch. I do not have a photo with the switch onto its original position. This is an exploded view 🙂

A typical Star-Delta switch needs 2 buttons (one NO and one NC), 3 load relays and one timer. Of course, i got also a thermal protection for the motor. I did not add a fuse switch because the supply already had one. Here are the parts:

The lamp that you see, i did not use it. When i gave power to this lousy cheap lamp it exploded. So i replaced it with 220v LED indication lamps. I totally suggest you use LED indication lamps for such automation.
In the box
First, i had to mount all the parts inside the box:
 |  |  |
| This is how i will put them (layout) | I cut a piece of this special profiled aluminum bar | I marked it |
 |  |  |
| Marked the point to drill | I drilled 3.8mm holes | And i screwed it on the box |
All the parts can now clip-on the profiled aluminum piece:

Wiring the parts
First of all, i needed a wiring diagram. A Start-Delta automation is one of the simplest automation, so i made a very rough diagram on a piece of paper within a few minutes.
 |  |  |  |
| This is the wiring diagram for the Star Delta automation | In industrial automation, always use wire-end metallic cups to secure the connection | This is the assy ready to be connected onto the machine | A closer look |
On the machine
I tested it in my lab. Then, i took it at the customer’s place.
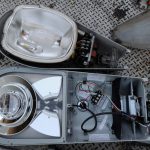
 |  |  |  |
| First, i made a base out of MDF wood and fixed it on the machine | This is how it looks from the side | With my special 22mm drill i will open holes for the wire grips | 2 at the bottom for the motor and one on the left hand side for the mains |
 |  |  |  |
| I connected the 3 wires, one for mains and 2 for the motors | I marked the 4 positions for the buttons and the lamps | Typically, such material require a standard 22mm hole to fit | everything is in position now |
That’s all…
Nothing hard, nothing fancy. Just a typical Star Delta automation. The green button starts the sequence, the red button stops the machine, the green LED lights when the machine is running and the red LED lights if the thermal protection is tripped. This is how it looks on the machine: